Are you looking for an affordable payment gateway in Malaysia? Then, you’ll enjoy reading this Billplz tutorial.

Why so?
- Very affordable plans.
- It costs RM 1.50 only per transaction.
- No downpayment fees.
- It makes the checkout process a breeze.
- Supports almost all the banks in Malaysia.
- You can opt to include in credit cards too.
I am a WooCommerce user.
Therefore, I will be focusing mainly on how to set up Billplz from WooCommerce point of view.
Billplz Registration
Now, before you start signing up for it, this is what you need:
- A registered company.
- A business registration number.
- A company bank account number.
If you are an individual with a personal savings/current bank account, then you are out of luck.
As as result, Billplz will not approve your application.
Once you have all the details stated above, it’s time to sign up!

You will be greeted with this at the registration page.
Just fill up the required details and that’s it!
All you need to do is to wait for your bank account to be verified.
Verification will take a couple of days so just relax.
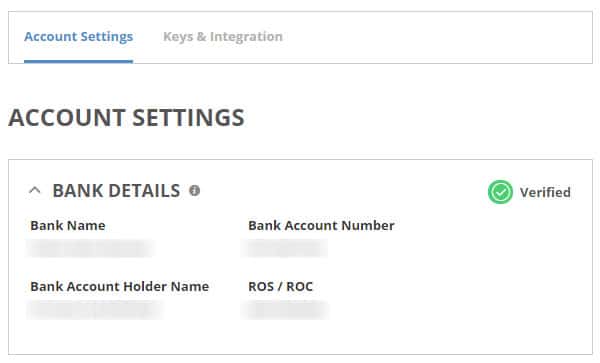
You can log in to check the verification status under Account Settings.
Once you are verified, you are good to go!
Installing Billplz Plugin
As I have mentioned earlier, I will be focusing on WooCommerce.
Therefore, it is important that the WooCommerce plugin is installed first.
To use the plugin, simply head over to the plugins directory on your WordPress dashboard.
Plugins > Add New > Search “Billplz”
You will notice these 3 categories, Billplz for:
- WooCommerce
- GravityForms
- Easy Digital Downloads

Well, no brainer here.
Install the one for WooCommerce.
Once it’s installed, remember to activate it.
All you need to do now is to set it up correctly to receive payments.
Setting Up Billplz
In order for the plugin to work correctly, you have to key in the right details.
Now, back to your WordPress dashboard first.
WooCommerce > Payment > Billplz > Manage

You will be greeted with this page.
Before you enable it, make sure you fill up all the required details first.
More importantly this 3 columns:
- API Secret Key
- Collection ID
- X Signature Key
What are all these?
The API Secret Key is meant to connect your Billplz account to your plugin.
The Collection ID is for you to collect your payments.
As for X Signature Key, it’s meant for your customers to return to your website after making a payment.
Even if a customer cancels a payment, he/she will be returned to your website.
Otherwise, your customer will end up on an odd-looking blank page.
Of course, this is definitely not wanted.
Because you may end up losing a customer if he/she decided to cancel a payment to make adjustments to the shopping basket.
So, where do you get all these keys?

After you have logged into Billplz:
Settings > Keys & Integration
You can get your API Key and X Signature Key from the above.
Also, remember to enable X Signature payment completion.
Otherwise, your customers will not be redirected back to your website.
As for the Collection ID:
Billing > Create Collection

After you’ve created your collection, you will be given a Collection ID.
Enter it into your WooCommerce settings.
You can create multiple Collection IDs but one would be enough for now.
Well, unless you’re running multiple stores at once then you can create as many as you need.
Once you have filled up the necessary details, you can enable Billplz.
Billplz Customization
Here comes the interesting part.
You want it to be more personalized.
At least for me, that’s very important when it comes to function and looks.
Remember in Chapter 3, you are given the options change the Title and Description.
- Make the title easily recognizable, at least for fellow Malaysians.
- Online banking or internet banking are the more common terms.
- Your description should be short and sweet.
- Do not write an essay.
You can also edit the button itself.

Not many are familiar with Billplz yet compared to MolPay or iPay88.
So if the button is “Pay with Billplz”, some may be a bit hesitant to do so.
Instead, you can change it to “Pay Now”.
This will definitely increase the chances of your customer taking an action.
And lastly, you can change the default payment image.
No offence to Billplz but I find the default image a little odd to my liking.

Therefore, with a little tweak behind the scenes, you can change to an image you want.
This is how it looked like after the change.

It looks more pleasant to the eyes, at least for me.
So how are we going to change it?
This itself is going to be a little tricky as you need to log into your web hosting server to change it.
You will have to it via FTP or a web hosting control panel such as cPanel.
Look for the Billplz plugin folder.
public_html > wp-content > plugins > billplz-for-woocommerce > assets
You will notice a filename called billplz.gif in the folder.
Here’s what you need to do:
- Get your replacement image ready, be it in jpg, gif or png format.
- Upload the image into the assets folder.
- Write down the filename of your new image.
- Keep the original file.
public_html > wp-content > plugins > billplz-for-woocommerce > billplzWoo.php
Now, look for the billplzWoo.php file.
Open up the file using an editor.
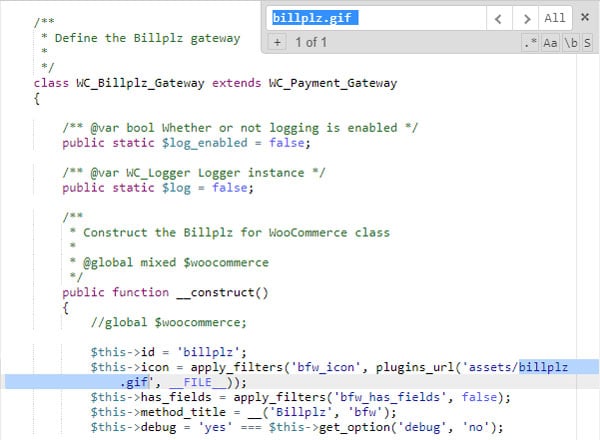
Use the search function (Ctrl+F) to look for the line that contains billplz.gif.
Replace it with the filename of your new image.
And that’s pretty much it.
Double check and see if your new image has replaced the default image.
If it has, well done!
You have successfully customized Billplz.
Using Billplz
Finally, it’s time to start using Billplz.
Apart from the slightly complicated customization part, it is a relatively straightforward process.
To start using, you’ve got to pick a plan first.

For a start, you can go with the Standard plan first.
You can feel at ease since there’s no additional monthly charges involved.
Once your sales pick up, you can upgrade to the Preferred or Priority plan any time.
Also, if you want your store to feel a little more premium, you can add in the Premium option.
This allows you to skip the Billplz page completely so they will not be seen as the middle-man.
So, it’s just you and the banks involved.

Once your Billplz is up and running, you can download account statements from the dashboard.
Billplz + Credit Cards
If you like to have an option for your customers to pay with credit cards, Billplz can accept payments on their behalf.
At the moment, you can integrate PayPal or 2C2P with it.
One important thing to note.
Billplz does not process credit card payments.
Also, you would need to pay a small fee of RM30/month for credit card payments to be accepted.
Nonetheless, this is completely optional and you don’t have to use it if you don’t want to.
Personally, I don’t find this entirely useful if you are using WooCommerce.

Why?
As you can see, you can use PayPay straight from WooCommerce itself.
And you can download the 2C2P plugin from the WordPress plugins directory.
All you need to do is just to set up an account with either PayPal or 2C2P.
Don’t you think you get no extra benefits by doing the additional work?
Now It’s Your Turn
Yup. That’s pretty much all there is on how to use Billplz for WooCommerce.
Hope you find this tutorial useful.
So, which plan will you be using?
And, was the set up easy?
Or are you having difficulties setting it up?
Let me know in the comments section so we can learn together.
hi, I want to ask a question, why after i sign in billplz i do not get any email from billplz. so how I want to verify my billplz account?
Hi Siti,
The verification process is automatic. As long as you registered your company’s bank account number (personal accounts will be rejected), you should be verified in 3 working days or so. If you don’t, just email Billplz. They reply fast.
Hi,
I am a developer interested in using billplz as my company’s payment gateway.
Can i get some sample php code to request and process reply from billplz? Nothing fancy, just the basics for server to server communication.
Hi Ihsan,
You’ll get access to the PHP code when you sign up for Billplz services. It’s under the dev section and it’s pretty comprehensive too.
Hi, for preffered or priority means we will be charged monthly PLUS RM0.50 per transaction is it? And the charge for the transaction will be deducted directly from our bank account or they will take from the payment made by customer?
Let say customer paid RM30 and we will received RM28.50 (if i choose standard package). Is it work like that or how?
Hi Kim,
You will have to reload a certain amount of credit first. Say, RM50. Each time a transaction is made, RM1.50 will be deducted from your balance. It’s like a wallet. So if a customer pays RM30, you will get RM30. So that makes accounting a lot easier. The RM1.50 will be deduced from the “wallet” instead.
hi , if I dont have the acc my money transaction wont be proceed?
Hi Yanna,
You would require a Billplz account and a business bank account before you can proceed.
Once you have submitted your application, you’ll have to wait for Billplz’s approval before you can start receiving transactions.
Is there a way I can change the button label in the settings or do I need to edit the php file- billplzWoo.php?
Thank you and hope to hear back from you.
Hi JC,
You won’t be able to change the button label in the settings. You’ll have to edit the PHP file directly to make the amendments.
Hi there,
How would you suggest us to name our Collection Title (under Billing) in order to get a collection ID?
As mentioned in your post, collection ID is for us to collect payment. However, I am unsure how the naming of the collection title will affect anything, such as how customer view our e-store when they are about to make payment. Or, the collection ID is just a reference for ourselves and will be in between Billplz and us merchants only?
Hi, Alice.
The collection ID will show when a customer makes a payment on the payment page. It’s best to name it according to what you want the customer to see you as.